

How to Install Seed Boot Stabilizers
Red E
Октябрь 11, 2022

Tools Required
- Ratchet or Impact (Optional)
- M17 Wrench
- M17 Socket
- 5/8” or M19 Socket*
- 11/16” or M19 Wrench*
*Dependent on whether OEM bolt is standard or metric
Design Characteristics
- No drilling or machining required
- Can be re-adjusted if it becomes loose after use
- Grade 8 Hardware for longer life
- Patent # 9,485,903
Step-by-Step Instructions
Необходимое время: 20 минут
The Стабилизатор Pro-Stitch для высевающего башмака is a patented solution designed to eliminate the up and down movement of the seed boot and allow for a more consistent furrow and more even seed placement. The simple bolt-on design fits between the main opener arm boot pivot flanges and the seed boot.
- Remove gauge wheel, cutting disc and seed tube
Remove gauge wheel, cutting disc, and seed tube to allow proper access to boot pivots. Removing the seed tube by removing the seed tube bolt will make the installation easier but is not required due to the addition of the clevis pin. The boot stabilizer can be installed on a row unit that is either still on the machine or on a work bench.
- Thread nuts onto bolts
Thread the jam nuts onto bolts. Then, insert bolts into the two threaded holes on the top of the stabilizer. Do not tighten jam nuts yet. Ensure bolts are not sticking too far past bottom of “T” of stabilizer casting.
- Insert boot stabilizer casting
Place boot stabilizer casting between the opener arm cast ears so that it aligns with desired hole. Ensure the STABILIZER lettering is facing outwards to allow proper clerance between the clevis pin and the seed boot casting.
- Position boot spring and clevis pin
Place long side of boot spring in position on seed boot and hold with one hand while using other hand to install clevis pin (RE5016) through the seed boot, row unit casting, and stabilizer holes.
TIP: Get pin started in front half of casting and then apply leverage against boot while pushing on the pin to get it through the entire casting. With the right amount of hand pressure, angle, leverage, and wiggle this will go smoothly. - Install cotter pin
Once the clevis pin is installed, install the cotter pin to hold the clevis pin in place. Ensure head of clevis pin is flush against seed boot so that the seed tube can be installed later. Note that the clevis pin may be installed from either direction. A bolt may also be used in place of the clevis pin.
- Tighten bolts and jam nuts
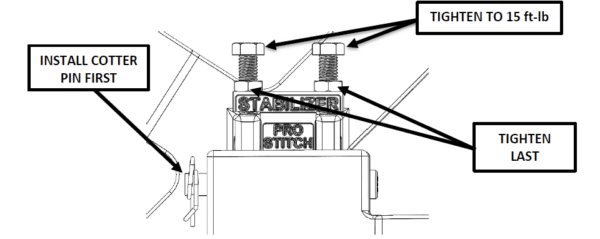
Tighten top bolts to lock the clevis pin up. Then tighten jam nuts to keep the bolts in place thus securing the stabilizer in place. (See below diagram)

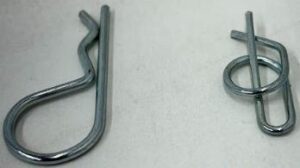
NOTE: RE5022 may be shipped as either a hairpin (left) or a locking cotter pin (right), as shown below. Both variations of the pin are acceptable for use. The hairpin may be installed all the way to the final loop for added holding power.
NOTE: Top bolts need to be tightened to 15 ft-lb. Any more than 25 ft-lb may cause clevis pin to excessively bend and not work properly. - Ensure parts function properly
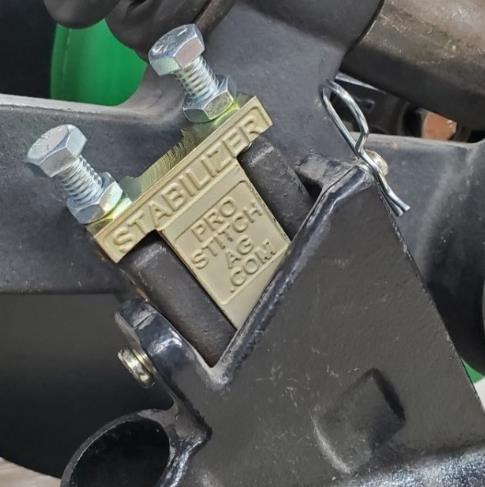
Ensure seed boot pivots, springs back, functions properly, and all components are properly tightened. Ensure there is no binding and that the boot has good spring tension against the cutting disc. Usually binding is caused by over torquing top bolts or by boot spring not being installed correctly. See picture for completed install of stabilizer. Seed tube and other remaining components can now be re-installed on row unit.

NOTE: On 60 series drills that have the original 60 series style seed boots, the long leg of the seed boot spring may need to be trimmed down ~1/8” to allow adequate clearance and prevent binding of spring when the stabilizer is installed.
To verify: Trim 1 boot spring, install on 1 row, and verify seed boot spring back and proper functionality. Adjust as needed for remaining rows.
Category: Air Drill Parts, Pro-Stitch
Tags: